Procedurally Generated Dungeon
- brotherstevenh9
- Apr 27
- 6 min read


The Following Project was Submitted to the Rookies if you would like to view it on there here is the link:
Irecievd the Following creditation:

Procedural generation is a vital pillar in the games industry, used not only for building environments but also for enhancing gameplay, this project explores the use of procedural generation and modular kits within the games industry by researching and developing a custom proecedual generation tool for unity engine.

The project began in Unreal Engine, creating a spline tool to generate meshes along curves. Then shifted to Houdini’s Wave Function Collapse method, which required building meshes into tile configurations matching Houdini’s Wang Tiles.


Wave Function Collapse is a procedural generation tool that analyses a sample, then fills each position by selecting options that follow learned constraints, creating consistent variations of the input.


A dungeon was generated with correct positions and rotations, however when transferring to Unreal, rotational information was lost, resulting in misaligned assets. After two weeks, no solution was found. This technical limitation and laco of understanding the Houdini-to-Unreal pipeline halted progress.my experience with houdini is incredibly minimal.


The project transitioned to Unity, where a procedural generation system was developed.
The object placer tool was developed. Initially, a single object was instantiated at predefined node positions during runtime to verify functionality. Next, an array of objects were added, enabling Random.Range() to spawn different props.
To enable instantiation within the Unity Editor, research was conducted using the Unity documentation, which explained the use of editor scripting such as the [ExecuteAlways] attribute and conditional checks for Application.isPlaying. These allowed functions like object instantiation and rerolling to execute in the editor. Following this, the tool was enhanced to allow configurable rotations for each instantiated object.
This is the Object placer tool that I developed for unity engine. Each item in the array consists of two elements: a prefab (the 3D object to place) and an optional rotation offset. When a node is moved a configurable distance, the script rerolls the selection, replacing the current object with a new randomly selected option.
To prevent unwanted changes, a lock feature can be enabled, freezing all placements at their current configuration.
Premade rooms were constructed and A master furniture-placement prefab was created, equipped with the ObjectPlacer script containing a list of assets such as bookcases, tables, and kegs.
Each of these assets, in turn, also utilised the ObjectPlacer script and included predefined nodes for prop placement.


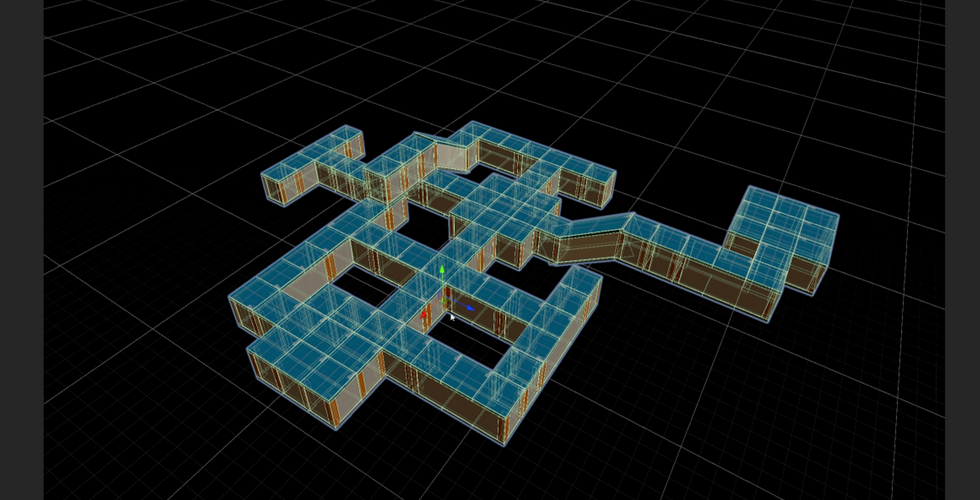
Using the predefined nodes from the ObjectPlacer script as positional anchors, a modular system for room instantiation was developed. A variety of rooms were created including staircases, libraries, T-junctions, corners, different starting rooms, exterior rooms with sky gaps, and courtyards.


Lighting was configured per room prefab to suit, where traditional methods like manual placement and baking were impractical. Iterative adjustments were made to ensure consistent results without further manual tweaks.

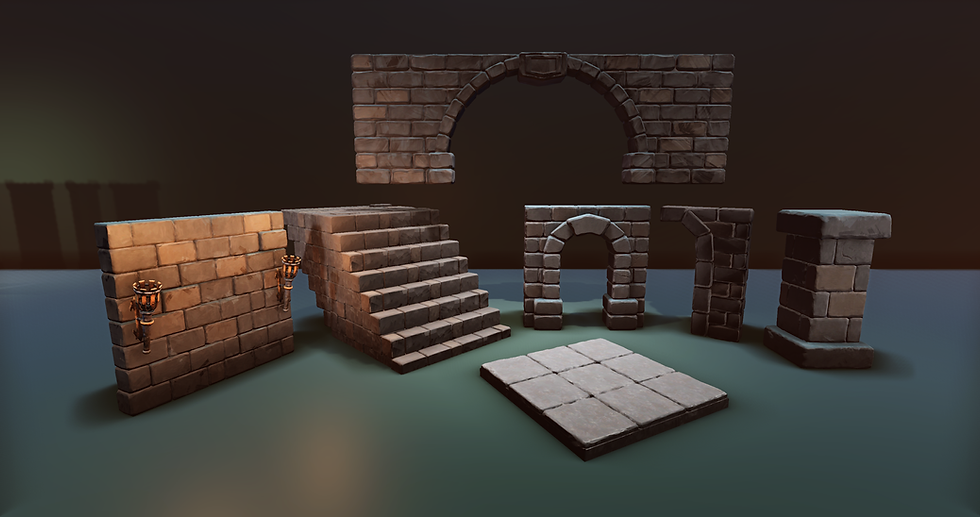
Basic Dungeon assets were created to a strict scale, modelling walls, pillars and floors. High-poly details were sculpted in ZBrush, with bevelled edges, damage and natural variation. A custom “Dungeon” material was developed in Substance Designer, replicating a paint style from a dungeons and dragons youtube channel. Wylock’s (2018) dungeon tile style digitally. Substance Painter’s hand-painted filter was used to simulate brush strokes and enhance texture variation. Once core assets were complete, the workflow, modelling, ZBrush detailing, and Substance Painter texturing—were efficiently applied to additional pieces for the dungeon.
After I had a strong basic form I moved on to creating more intricate assets for detailing the dungeon.


Enemy pathfinding was added, modifications were made to room prefabs to support this functionality. A “rift portal” model was created and placed within all designated starting room nodes to serve as the spawn point for enemies. To provide these enemies with a target, a door prefab was created and incorporated into a secondary end-cap room module.
The navigation mesh (NavMesh) had to be rebaked to reflect the updated layout. Enemies instantiate at runtime with a configurable spawn delay at the location of the rift portal. Each enemy uses a FindObjectsWithTag() function call to locate door objects.
A door target is then randomly assigned using Random.Range(), the enemy then navigates towards the target.


To increase variation, another tool was created to randomize materials on instantiated objects. Running in editor mode, the script selects a random material from a predefined array and applies it to a specified material slot on the object's renderer.
This approach enables variation for objects such as potions, books, and paintings without manual adjustment, enhancing the procedural generation systems flexibility and visual complexity.


A Trap Placer script was created to manage trap deployment. This script generates a placement grid within the editor, indicating valid locations where traps could be positioned. All traps were restricted to this grid.


A currency system was developed, allowing for configurable starting funds and individual trap costs. Three distinct trap types were created: crossbow turret, spike trap and a barrier. These traps weren’t play tested, their purpose is to act as proof-of-concept examples.


Creating Kev has honestly been one of the most fun and rewarding journeys I’ve had so far. It all started with trying to learn the fundamentals—sculpting heads from a Dynamesh sphere, focusing on anatomy, proportions, and structure. At first, I was aiming for realism, trying to get everything to look just right. But I kept running into frustration. Things like the ear placement, eye sockets, and especially the mouth bag gave me a really hard time. I was trying to sculpt Azog from The Hobbit at one point, but the pressure to hit accuracy made me stop enjoying the process.
That all changed when I allowed myself to just lean into what I actually love—stylised fantasy. Big shapes, bold designs, and exaggerated features like in Kameo, Spyro, and World of Warcraft. Once I stopped trying to force realism, I started having a blast. Kev came out of that mindset shift. I focused on building a chunky, dumb, but loveable brute—wide-set shoulders, a hunched frame inspired by gorillas and Warhammer orcs, and a face that screams “all brawn, no brain.” I had so much fun adding all the little details: the skulls in his armour, the drool, the snot, the sweaty T-zone—it brought so much personality to him.
I learnt loads from the technical side too—retopologising him to make him game-ready, baking down the high poly detail into a low poly mesh, and then taking him into Substance Painter to really push the textures. Shifting from the standard green skin I’d been painting on Warhammer models to using toads, frogs, and geckos as reference gave his skin a leathery, natural feel I’m really proud of. I even got to try new things like subsurface scattering for added realism and stylised weapons sculpted entirely in ZBrush.
Kev wasn’t just a sculpting exercise anymore—he became my go-to character. And later down the line, I ended up bringing him back as the AI enemy in my procedural dungeon project. It made perfect sense. He already had this big, intimidating presence, and using him to test and showcase AI pathing in the randomly generated dungeon gave him a whole new purpose. Which was very fitting as to provide demonstrative context to the showcase area the design drew influence from games such as Orcs Must Die! by Robot Entertainment and Dungeon Defenders by Chromatic Games and Kev fit that styling perfectly.

This project offered a valuable opportunity to build technical problem-solving skills in modular tool development and editor integration. Programming confidence grew significantly.
Community feedback was highly positive, describing the tool as “amazing,” “clear-ly explained,” and “This is incredible work! I could definitely see myself using these tools. I would even go as far as saying you could sell these tools on the asset store..” One viewer noted, “I know next to nothing about Unity, and it still made sense,” suggesting the system’s accessibility and potential for release on the Unity Asset Store.
Future iterations would benefit from a stronger research and design phase, im-provements to dungeon regeneration to avoid data loss, and features like seed in-put for consistent results.
There are aspects of the project that were overcomplicated and could be refined, the trap placement system uses prefabs to indicate valid and invalid placement positions, rather than changing the material. This approach increases both work-load and computational overhead, highlighting an area for optimization.
The project met its objectives, enhanced technical capabilities, and laid the groundwork for future development and refinement.

Comments